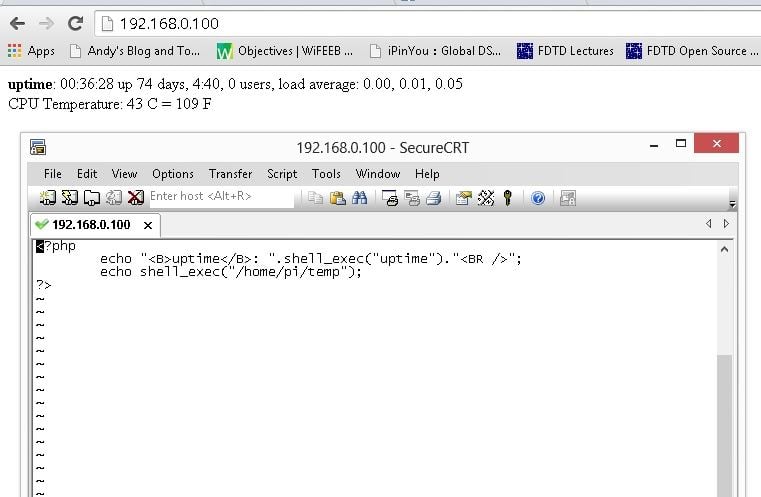
The Raspberry PI (so far, three models, A, B and B Plus) is a credit-card size tiny full functional PC that runs Linux (e.g. Raspbian). I have introduced the script to measure the temperature of the board. Here is an article to show you different ways to reduce the temperature of Raspberry PI by using coolers, fans. Under linux, you can use uptime to see how long the server has been running. Suppose, you have installed the apache2server, you can have a PHP page that displays these information by using shell_exec() or exec() function that executes these commands.
The shell_exec runs the linux command and returns all output as a string. However, this might be disabled for security purposes on some webhosting companies, e.g. Fasthosts disables this but Godaddy does not.
1 2 3 | <php echo shell_exec("uptime"); ?> |
<php
    echo shell_exec("uptime");
?>Refresh Every Few Seconds
The above script produces one-snapshot result, meaning that the result is not updated in real time unless you press F5 manually. You could use HTML refresh technique:
1 | <meta http-equiv="refresh" content="5" /> |
<meta http-equiv="refresh" content="5" />
The above should be placed within head of HTML code and will reload the same page every 5 seconds. This can also be done using Javascript:
1 | setTimeout(function () { location.reload(1); }, 5000); |
setTimeout(function () { location.reload(1); }, 5000);However, if you don’t want the whole page refreshing, you can use a better solution that is Ajax. Ajax allows you to get content asynchronous, which is considered efficient. The following Javascript is based on JQuery and it updates the HTML element with id status every 5 seconds. The cache=false is recommended because in IE browsers, if you don’t add this, most likely the content will be cached and you will not notice any updates. The ajax calls won’t work if the URL is on some other domain (cross-domain). So you have to ensure that both URLs are at the same domain.
1 2 3 4 5 6 7 8 9 10 11 12 13 | <div style='width:300px' id='status'> </div> <script> function update() { $.ajax({url: "http://192.168.0.100/status.php", cache:false, success: function (result) { $('#status').html(result); setTimeout(function(){update()}, 5000); }}); } update(); </script> |
   <div style='width:300px' id='status'>

  </div>

  <script>
    function update() {
       $.ajax({url: "http://192.168.0.100/status.php", cache:false, success: function (result) {
                $('#status').html(result);
                setTimeout(function(){update()}, 5000);
                }});
   }
    update();
</script> The other alternative as to setTimeout is setInterval. Both differ slightly. The setTimeout usually invokes (fires) the function at the given delay (second parameter) once and that is why you put another call inside the called-function to ensure repeatedly function calls at interval. The setInterval will set up the repeatedly function calls at the interval (second parameter) anyway (no need to explicitly call the function again). Both timers can be cleared by clearTimeout or clearInterval respectively.
You can also use Python script to retrieve the CPU temperature of the Raspberry PI: How to Monitor the CPU Temperature of Raspberry PI using Python Script?
Raspberry Pi
- Visiting The Raspberry Shop in Cambridge UK
- Overclocking ARM CPU of Raspberry PI 4 and 400 with Temperature Cooling Measures
- BASH Script to Monitor the CPU Frequency and Temperature on Raspberry PI
- All-In-One Raspberry PI 400 Kit - Personal Computer Kit with Raspbian OS
- How to Monitor the CPU Temperature of Raspberry PI using Python Script?
- Use PHP Script to Monitor Temperature and Uptime for Raspberry PI in the Browser
- Review: Raspberry PI B Plus Model
- Different Approaches to Reduce the CPU Temperature of Raspberry PI
- Test SD Card Speed on Raspberry PI
- Remote Desktop Connection for Raspberry PI (xrdp)
- Using a external USB cooler fan to drop temperature of Raspberry PI (Model B) from 51 degrees downto 40 degrees for just ten minutes
- How to Get the CPU Temperature on Raspberry PI using BASH Script?
- Apache Server (PHP + MySQL) on Raspberry PI
–EOF (The Ultimate Computing & Technology Blog) —
loading...
Last Post: Block 426 Low CPC Advertiser URLs in Adsense - Using VBScript to Remove Duplicate Domains
Next Post: Add a Next Random Post in WordPress Page Template

For this to work you need to add the script sources for ajax. I tried to post the lines here but it blocked me.
It doesn`t work. Can you please paste the entire code. Thanks
Will you please share the code ?
the code is in the text.