Last week, we talked about the loops (for and while), this week, we’ll learn the basics of the LED screen of the Microbit.
Basics of LED
The LED is a tiny ‘screen’ that Microbit has. It is a 25 pixel output device (5 rows and 5 columns). The rows we are referring as the Y-axis where the columns are X-axies. The computer usually start counting (indexing) from number ZERO instead of one. Thus, the top left corner (first pixel) is referred to as X=0, Y=0 and the first pixel second row is referred to as X=0, Y=1.
Plotting and Unplotting in Microbit
To plot a pixel (turn a pixel on on the LED), we can drag the ‘Plot’ on the LED tab.
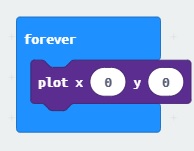
microbit-plot-on-led
And as you will see, the pixel (top-left corner) is turned on.
microbit-plot-a-pixel
This is essentially the same as the following Javascript code:
basic.forever(function () {
    led.plot(0, 0)
})
To unplot a pixel, we use the led.unplot method, then we can do some animations. A computer animation is just like drawing something, wait sometime (a few milliseconds), erase the original stuff, and then draw the stuff on the new location – then repeat the process that will be showing the animation to the human eyes.
a Running Pixel on Microbit
We can draw a running pixel on the first row by the following:
microbit-a-running-pixel-on-the-first-row
Corresponding to the following Javascript code:
let x = 0; // initial x coordinate

basic.forever(function () {
    led.plot(x, 0);   // plot the pixel
    basic.pause(100); // wait 100 ms
    led.unplot(x, 0); // erase the pixel
    x += 1;           // move the pixel one to the right
    if (x > 4) {   // if the pixel coordinate is 5
        x = 0         // then rewind it to 0 (beginning)
    }
})
Our first animation using the Microbit is accomplished! We use the // to start a line-comment which will be ignored by the computer. A comment helps humans to understand the code better.
When the x coodinate of the pixel is beyond the maximum range of the LED screen, we need to make it to the begining of the row – by setting is to zero.
We can also use the modulos operator (%) which is used to get the remainder of a division calculation. For example, 7 % 3 is 1, which is read as: 7 divide by 3 and the remainder is 1.
Thus the above can be written as:
let x = 0; // initial x coordinate

basic.forever(function () {
    led.plot(x, 0);   // plot the pixel
    basic.pause(100); // wait 100 ms
    led.unplot(x, 0); // erase the pixel
    x = (x + 1) % 5;  // move X one to the right
                      // rewind to zero if it is 5
})
This can be visualised as:
microbit-a-running-pixel-on-the-first-row-second-version
To make the pixel run in the reverse direction e.g. from right to the left, we can decrement the X coordinate and rewind X to 4 when X falls negative.
let x = 0; // initial x coordinate

basic.forever(function () {
    led.plot(x, 0);   // plot the pixel
    basic.pause(100); // wait 100 ms
    led.unplot(x, 0); // erase the pixel
    x -= 1;           // move the pixel one to the left
    if (x < 0) {   // if the pixel coordinate is negative
        x = 4         // then rewind it to 4 (last column)
    }
})
This can be visualised as:
microbit-a-running-pixel-on-the-first-row-to-the-left
By using the modulos % operator, we need a special trick to turn the negative into positive by adding 5 pixels:
let x = 0
basic.forever(function () {
    led.plot(x, 0)
    basic.pause(100)
    led.unplot(x, 0)
    x = (x - 1 + 5) % 5; // when X is 0, X will become 4
})
To make the pixel running from first row to the last row, row by row (from left to the right), we can rewind the pixel to the begining of next row, and when it is beyond the last row, we need to set it back to the first row. The code looks like:
let x = 0, y = 0;

basic.forever(function () {
    led.plot(x, y);    // show the pixel
    basic.pause(100);  // wait
    led.unplot(x, y);  // erase the pixel
    x ++;              // move to the right
    if (x == 5) {      // end of the current row
        y ++;          // jump to the next row
        x = 0;         // begining of the next row
        if (y == 5) {  // beyond the last row
            y = 0;     // rewind to the first row
        }
    }
})
Note that, we need to declare two variables: X and Y to hold the position of the current pixel.
microbit-running-pixel-from-left-to-right-top-to-bottom
Other Notes
We talked about the binary – which the computer knows. The Computer (including Microbit) converts everything into Binary. A binary consists of two types of digits: 0 and 1. For example, the first few numbers of binary:
0      // 0
1      // 1
10     // 2
11     // 3
100    // 4
101    // 5
110    // 6
111    // 7
We also talked about the arrays in Javascript. An array holds (groups) a few data so that we can use them in a loop. For example, we can show a few Numbers in an array:
basic.forever(function () {
    let data = [1, 3, 5, 2, 3];
    for (let x of data) {
        basic.showNumber(x);
    }
})
This can be visualised as:
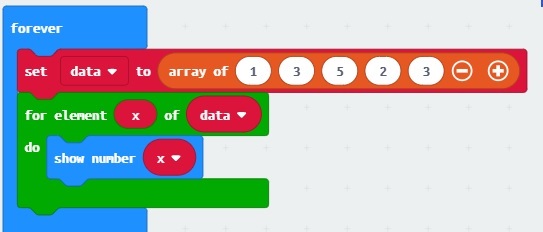
microbit-show-array
We can loop over the index variable and access the elements in the array using the following sytnax:
basic.forever(function () {
    let data = [1, 3, 5, 2, 3];
    for (let x = 0; x < data.length; x ++) {
        basic.showNumber(data[x]);
    }
})
Note that we use the data[x] to access the element in data array with position x (where the position starts at zero). The .length property returns the size of the array so that we know the index is ranged from 0 to .length-1.
Homework (Follow-up)
Could you make a running pixel on Microbit that starts from the bottom-right corner and running from right to the left, bottom to the top, repeatedly? e.g. when the pixel lands at the top-left corner, its next position will be rewinded to the last corner on the LED screen.
Start coding the Microbit at: https://makecode.microbit.org/#editor
–EOF (The Ultimate Computing & Technology Blog) —
1281 wordsLast Post: How to Print Immutable Linked List in Reverse using Recursion or Stack?
Next Post: The Contiguous Binary Array with Equal Numbers of Ones and Zeros