What Will I Learn?
Chrome browser is so powerful that you can write a few gadgets using Javascript for Chrome bookmarks.
- You will learn what is a chrome bookmark script.
- You will learn how to write chrome bookmark script.
- You will learn the SteemIt example to show the real time Voting Power and Reputation for a user.
Requirements
In order to proceed with this tutorial, you will need to have:
- a installed Chrome browser
- basic Javascript knowledge
Difficulty
Intermediate
Tutorial Contents
Chrome browser has a bookmarks bar that you can turn it on by:
- type chrome://settings/ at URL bar
- turn it on by enabling Show bookmarks bar
You can drag any URLs to the bookmarks. However, the most powerful part is that you can add Javascript code to your bookmarks.
To add a Bookmark, you can:
- type chrome://bookmarks/ at URL bar
- right click the top right icon and select Add New Bookmark
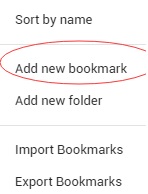
add-new-bookmark
At the prompt up dialog, you can choose a bookmark name and type in javascript code that starts with javascript:
For example, the following will add a bookmark test and if you click on it, the javascript code will be executed that leads to my steemit profile page.
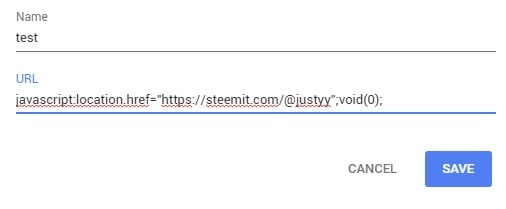
sample-bookmark-chrome-javascript
SteemIt Voting Power and Reputation Checker
Let’s continue with a more advanced example. I have provided two APIs to retrieve the voting power and reputation in full digits:
This will return a number indicating the reputation for the given user.
https://helloacm.com/api/steemit/account/reputation/?id=justyy
and this will return a number indicating the voting power for the given user.
https://helloacm.com/api/steemit/account/vp/?id=justyy
So, the design is, if we first click the bookmark, it will ask for the steem id, which will be stored in chrome’s localStorage object. Once the browser remembers the steem id, it will fetch these two data from these two separate APIs.
The first part is to ask for ID and remember it. The javascript code is:
var steem_id = localStorage.getItem("steem_id");
if (steem_id == null) {
    steem_id = prompt("Please enter your SteemId");
    localStorage.setItem("steem_id", steem_id);
}
Next, we are going to use fetch and then (the Javascript Promises) to chain these two events.
if (steem_id != null) {
    fetch('https://helloacm.com/api/steemit/account/reputation/?id=' + steem_id, {mode: 'cors'})
    .then(validateResponse)
    .then(readResponseAsJSON)
    .then(function(rep) {
        fetch('https://helloacm.com/api/steemit/account/vp/?id=' + steem_id, {mode: 'cors'})
        .then(validateResponse)
        .then(readResponseAsJSON)
        .then(function(vp) {
            var msg = "ID: " + steem_id + "\n" +
                      "Reputation: " + rep + "\n" +
                      "Voting Power: " + vp;
            alert(msg);
        })
    })
}
The validateResponse is defined as follows that checks if the API is available and returns correct responses:
function validateResponse(response) {
  if (!response.ok) {
    throw Error(response.statusText);
  }
  return response;
}
The readResponseAsJSON is just to return the text as JSON
function readResponseAsJSON(response) {
  return response.json();
}
And you just need to copy the entire Javascript to the bookmark contents (remember to insert at the beginning with the string javascript:).
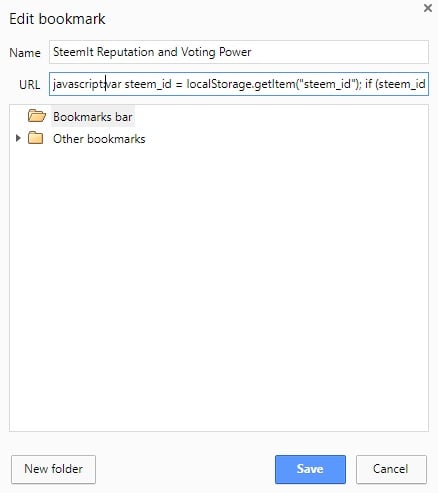
edit-bookmark-js-chrome
Now, if you click it, it will ask you for the ID.
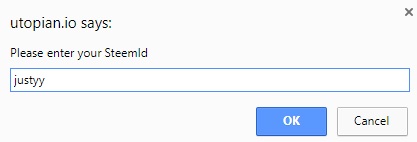
utopian-asks-for-steem-id
Then, this small tool will show your realtime voting power and reputation by just one click.
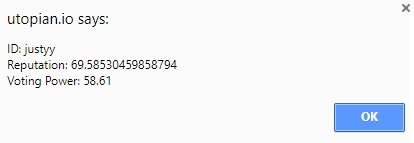
utopian-says-reputation-voting-power-steemit
Entire piece of bookmark code to take-away
javascript:
var steem_id = localStorage.getItem("steem_id");
if (steem_id == null) {
    steem_id = prompt("Please enter your SteemId");
    localStorage.setItem("steem_id", steem_id);
}

function readResponseAsJSON(response) {
  return response.json();
}

function validateResponse(response) {
  if (!response.ok) {
    throw Error(response.statusText);
  }
  return response;
}

if (steem_id != null) {
    fetch('https://helloacm.com/api/steemit/account/reputation/?id=' + steem_id, {mode: 'cors'})
    .then(validateResponse)
    .then(readResponseAsJSON)
    .then(function(rep) {
        fetch('https://helloacm.com/api/steemit/account/vp/?id=' + steem_id, {mode: 'cors'})
        .then(validateResponse)
        .then(readResponseAsJSON)
        .then(function(vp) {
            var msg = "ID: " + steem_id + "\n" +
                      "Reputation: " + rep + "\n" +
                      "Voting Power: " + vp;
            alert(msg);
        })
    })
}
You may also like: 教程: 怎么样写 Chrome 书签程序?
–EOF (The Ultimate Computing & Technology Blog) —
979 wordsLast Post: Adding Sponsors Class to PHP Client of Utopian API
Next Post: Adding `Image Download List` to the Popular `VideoDownloadHelper` Chrome Extension
Very useful post – instead of using JavaScript. You can upload raw files that are publicly available. Just Go…