Last week, we talked about the LED pixels. And by using the knowledge we have learned so far, we can make a pixel running on the Microbit’s LED. Last week, the pixel is running from the first row (from left to right) till the last row of the LED and then re-wind to the top-left pixel.
How about we making a pixel that runs along the edges of the LED screen? We can declare two sets of variables: (x, y) and (x offset, y offset). The (x, y) are the coordinates of the current pixel (location) and the offset variables represent the direction that the pixel is going (in the next pixel).
let x = 0, y = 0;
// starting direction = RIGHT
let xoffset = 1, yoffset = 1;
Then, similarly to make the pixel running towards a direction, we can plot and unplot the pixel, wait a few interval.
basic.forever(function() {
   led.plot(x, y);
   basic.pause(100);
   led.unplot(x, y);
   x += xoffset;
   y += yoffset;
});
The Javascript code above will make a pixel running from (0, 0) – top-left corner towards the right, and it will soon disappear as its position is beyond the rightmost border of the LED screen.
We can then check if the pixel is at the rightmost (the top-right corner), then make a right turn if it is.
basic.forever(function() {
   led.plot(x, y);
   basic.pause(100);
   led.unplot(x, y);
   x += xoffset;
   y += yoffset;
   if (x == 4 && y == 0) { // if it is at the topright corner
      xoffset = 0;
      yoffset = 1;   // change direction.
   }
});
Similarly, we have to deal with other three corners, to make the pixel keep running along the edges without problems.
basic.forever(function() {
   led.plot(x, y);
   basic.pause(100);
   led.unplot(x, y);
   x += xoffset;
   y += yoffset;
   if (x == 4 && y == 0) { // if it is at the topright corner
      xoffset = 0;
      yoffset = 1;   // change direction to DOWN
   } else if (x == 4 && y == 4) { // the bottom-right corner
      xoffset = -1;
      yoffset = 0;   // make direction LEFT
   } else if (x == 0 && y == 4) { // the bottom-left corner
      xoffset = 0;
      yoffset = -1;  // make direction UP
   } else if (x == 0 && y == 0) { // the top-left corner
      xoffset = 1;
      yoffset = 0;  // make direction RIGHT
   }
});
The Microbit project/simulator: https://makecode.microbit.org/_L4X75r3b4FUU
Using a Sprite
The above code works fine, but just a bit lengthy and complex as we have to deal with changing the directions and moving the pixel by modifying the coordinates and the direction offsets. We can use a Sprite – which is an Object Oriented Programming (OOP). A Sprite can be thought as a Pixel Object and we can invoke several methods on it e.g. move, turnLeft, turnRight etc. There is also a method ifOnEdgeBounce() to make the pixel change to opposite direction if it hits the edge.
We can use game.createSprite() method to create a sprite. The parameters (x, y) are required to set the initial coordinate of the sprite.
let pixel = game.createSprite(0, 0);

basic.forever(function() {
   pixel.move(1);  // move the pixel along its direction by 1 unit
   if (pixel.isTouchingEdge()) { // if it touches the edge
      pixel.turnRight(90);       // make a turn by 90 degree (right turn).
   }
   basic.pause(100);
});
The Microbit project/simulator: https://makecode.microbit.org/_b6q2d8Cym63P
However, it does not work as expected but it is kinda cool.
The reasons behind this code is: when pixel is on the edges it will turn right. The corners are edges but edges are not essentially the corners. We can fix the code by adding a function to check if a pixel is on the corner.
function isAtCorner(pixel: game.ledSprite): boolean {
  const x = pixel.x();
  const y = pixel.y();
  return ((x == 0) && (y == 0)) ||
         ((x == 0) && (y == 4)) ||
         ((x == 4) && (y == 0)) ||
         ((x == 4) && (y == 4));
}
The entire code is at: https://makecode.microbit.org/_VD17z4exrWED
let pixel = game.createSprite(0, 0);

function isAtCorner(pixel: game.LedSprite): boolean {
    const x = pixel.x();
    const y = pixel.y();
    return ((x == 0) && (y == 0)) ||
        ((x == 0) && (y == 4)) ||
        ((x == 4) && (y == 0)) ||
        ((x == 4) && (y == 4));
}

basic.forever(function () {
    pixel.move(1);
    if (pixel.isTouchingEdge() && isAtCorner(pixel)) {
        pixel.turnRight(90);
    }
    basic.pause(100);
});
Here we use game.LedSprite to specify the type of the input to the isAtCorner function. The function’s return type is boolean – which can be either TRUE or FALSE. Then we can only make a turn As Long As it is at corner and TouchingEdge. Please note that it is enough to check isAtCorner() although we put both boolean expressions here to show the usage of the logical AND operator i.e. &&
Randomness of Game
Randomness is very important in Gaming which makes a game fun. We can use the Math.randomRange(from, to) function to generate a random integer in the range [from, to] inclusive. For example, the following will make the pixel jumping randomly in the LED screen.
let pixel = game.createSprite(0, 0);

basic.forever(function () {
    const x = Math.randomRange(0, 4);
    const y = Math.randomRange(0, 4);
    pixel.goTo(x, y);
    basic.pause(100);
});
The code/simulator: https://makecode.microbit.org/_W64WXLEDX6Xq
Making a Catching Apple Game on the Microbit
We can make a game by the skills that we’ve learned so far (actually I came this up when I was teaching). We can generate a random apple dropping and then we need to catch/eat it.
// generate an apple object randomly on the first row
let apple = game.createSprite(Math.randomRange(0, 4), 0);
Then, we can place initially the plate on the last row, in the middle:
let pixel = game.createSprite(2, 4);
Then, we can control the plate by moving left or right (one pixel at a time) using two buttons, Button A and Button B. The code should be as easy as the follows:
input.onButtonPressed(Button.A, function() {
    pixel.changeXBy(-1);
});

input.onButtonPressed(Button.B, function() {
    pixel.changeXBy(1);
});
Please note that, the sprite.changeXBy(offset) method takes an integer which represents the offset to change i.e. the position will move by this offset. Similarly, we have changeYBy. These two methods will limit the sprite within the LED screen meaning that when pixel has coordinate X = 0, calling changeByX(-1) will not change X coordinate as it is already at the leftmost (first column) and it is restraint to the LED screen.
To make the game more user-friendly, we can improve this by allowing the plate pixel rewind to the other side e.g. when pixel is at leftmost, you can press A button go to the rightmost and vice versa. This will shorten the time to catch an apple sometimes, and it gives users one more option.
let px = 2;
let py = 4;

input.onButtonPressed(Button.A, function () {
    px--;
    if (px < 0) px = 4;
    pixel.setX(px);
})

input.onButtonPressed(Button.B, function () {
    px++;
    if (px > 4) px = 0;
    pixel.setX(px);
})
We can also define buttons A+B (when pressed at the same time) to reset the game.
input.onButtonPressed(Button.AB, function () {
    if (apple.y() == 4) { // avoid mistakes
        game.setScore(0);
        score = 0;
        apple.goTo(Math.randomRange(0, 4), -1);
    }
})
Here, we only reset the game, when the apple is on the ground, so you don’t accidentally reset the game while playing. And we reset the score to zero. Also the apple needs to be moving to another initial random location.
The game.setScore(score) sets the internal score number, which will be shown when you call game.gameOver(). The method is similar to the following:
function gameOver() {
  basic.showString("Game Over, Score: " + score);
}
We define a global score variable – which isn’t mandatory, as we can use the game.addScore(score) or game.setScore(score) to change/alter the score as well.
In order to make the game more challenging, the delay time can be shortened everytime when score is incremented (when you catch an apple).
basic.forever(function () {
    apple.changeYBy(1);       // apple is dropping
    if (pixel.isTouching(apple)) {  // when you catch it
        score++;
        apple.goTo(Math.randomRange(0, 4), -1); // generate another apple
    } else if (4 <= apple.y()) {   // the apple falls on the ground
        basic.showNumber(score);
        game.setScore(score);
        game.gameOver();
    }
    let delay = 500 - 10 * score;   // dropping faster and faster
    delay = Math.max(50, delay);    // max drop speed
    basic.pause(delay);
})
Here is the main game logics, at the main loop, the apple will first drop 1 pixel. Then we check if we catch it by using the sprite.isTouching(anotherSprite) method – which is the collision detection of two sprites. Then we also check if the apply Y coordinate is above or equal 4 – which has fallen on the ground. Then we can delay some interval (the delay is shorter and shorter, and the apple is dropping faster and faster).
The max dropping speed is restraint to 50 by using the Math.max() function which is the same as the following:
if (delay < 50) {
  delay = 50;
}
The eat-apple-game is available: https://makecode.microbit.org/_DV93uT7i0WuK
The visualization of the Microbit shows the components of the game.
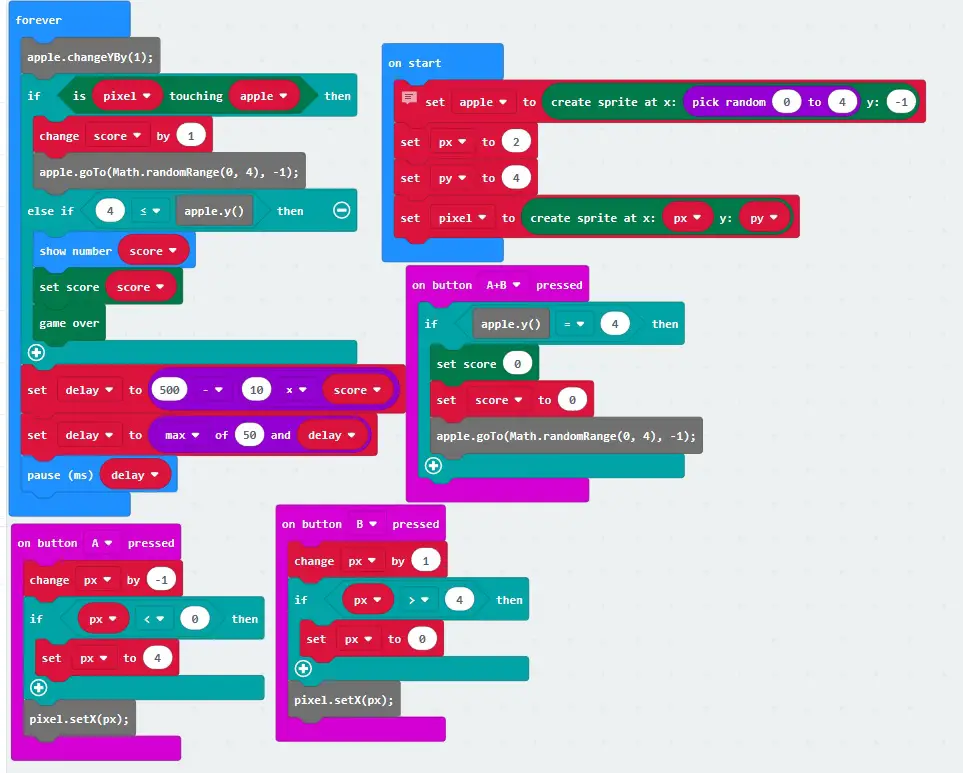
microbit-eat-apple-game
Next week, we are going to introduce the game AI – letting Microbit play this game: Microbit Programming: Introduction to AI – Letting Computer Play the Game
For Microbit’s Python Version of this Catch-Apple-And-Eat Game: Teaching Kids Programming – Design and Develop an Apple Catching Game on Microbit using Python
–EOF (The Ultimate Computing & Technology Blog) —
1917 wordsLast Post: The enumerate method in Magik Programming
Next Post: How to Summary Ranges using O(N) Two Pointer Algorithm?