Recently, I ordered a dedicated server from Dacentec and the specs says i should have 2x1TB HDD but when I run the lsblk command, I only found one. Here is the output:
root@steem:~/steem-docker# lsblk
NAME           MAJ:MIN RM   SIZE RO TYPE MOUNTPOINT
cciss/c0d0     104:0    0 931.5G  0 disk
|-cciss/c0d0p1 104:1    0   237M  0 part /boot
|-cciss/c0d0p2 104:2    0     1K  0 part
|-cciss/c0d0p5 104:5    0 931.2G  0 part /
`-cciss/c0d0p6 104:6    0    91M  0 part
The customer support replied promptly:
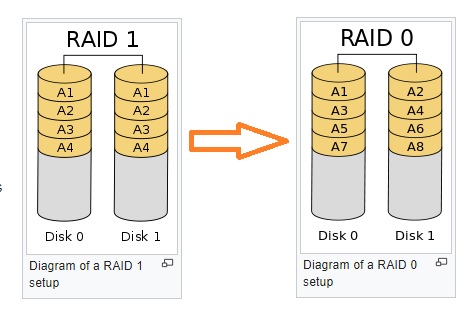
“This server has a P400 RAID card installed. The 2x1TB disks are likely in a RAID 1 array, making it appear to be a single 1TB from the output of the lsblock command. Would you like for us to set the 2x 1TB disks in two separate RAID 0 arrays?”
Unfortunately, the server has to be re-created but luckily I didn’t lose any important data.
Initialize the RAID-0 Disk
We can then use the lsblk command to see the available hard disks on the server:
root@steem:/home/steem# lsblk
NAME           MAJ:MIN RM   SIZE RO TYPE MOUNTPOINT
cciss/c0d0     104:0    0 931.5G  0 disk
|-cciss/c0d0p1 104:1    0   487M  0 part /boot
|-cciss/c0d0p2 104:2    0     1K  0 part
|-cciss/c0d0p5 104:5    0 930.9G  0 part /
`-cciss/c0d0p6 104:6    0    90M  0 part [SWAP]
cciss/c0d1     104:16   0 931.5G  0 disk
As listed, the cciss/c0d1 is the second 1 TB hard drive. Then we first need to use the fdisk command to initialize the harddrive partition:
m to print the help for command:
root@steem:~# fdisk /dev/cciss/c0d1

Welcome to fdisk (util-linux 2.27.1).
Changes will remain in memory only, until you decide to write them.
Be careful before using the write command.

Command (m for help): m

Help:

  Generic
   d   delete a partition
   F   list free unpartitioned space
   l   list known partition types
   n   add a new partition
   p   print the partition table
   t   change a partition type
   v   verify the partition table
   i   print information about a partition

  Misc
   m   print this menu
   x   extra functionality (experts only)

  Script
   I   load disk layout from sfdisk script file
   O   dump disk layout to sfdisk script file

  Save & Exit
   w   write table to disk and exit
   q   quit without saving changes

  Create a new label
   g   create a new empty GPT partition table
   G   create a new empty SGI (IRIX) partition table
   o   create a new empty DOS partition table
   s   create a new empty Sun partition table
Then use F to confirm the harddisk is un-partitioned so that you don’t accidentally lose any data by choosing a wrong disk!
Command (m for help): F

Unpartitioned space /dev/cciss/c0d1: 931.5 GiB, 1000170266112 bytes, 1953457551                                               sectors
Units: sectors of 1 * 512 = 512 bytes
Sector size (logical/physical): 512 bytes / 512 bytes

Start        End    Sectors   Size
 2048 1953459598 1953457551 931.5G
Then, we need to first create a GPT paritional table, and then apply the n command to add a new partition:
Command (m for help): n
Partition number (1-128, default 1): 1
First sector (2048-1953459598, default 2048):
Last sector, +sectors or +size{K,M,G,T,P} (2048-1953459598, default 1953459598):

Created a new partition 1 of type 'Linux filesystem' and of size 931.5 GiB.
Then saving all the changing by w command – this will sync changes to disk and exit the fdisk:
Command (m for help): w
The partition table has been altered.
Calling ioctl() to re-read partition table.
Syncing disks.
Then, if you run the lsblk command you will see the new disk and partition:
root@steem:~# lsblk
NAME           MAJ:MIN RM   SIZE RO TYPE MOUNTPOINT
cciss/c0d0     104:0    0 931.5G  0 disk
|-cciss/c0d0p1 104:1    0   487M  0 part /boot
|-cciss/c0d0p2 104:2    0     1K  0 part
|-cciss/c0d0p5 104:5    0 930.9G  0 part /
`-cciss/c0d0p6 104:6    0    90M  0 part
cciss/c0d1     104:16   0 931.5G  0 disk
`-cciss/c0d1p1 104:17   0 931.5G  0 part
It is not yet done – we have to format the partition by using the mkfs.ext4 command:
mkfs.ext4 /dev/cciss/c0d1p1
Then we can mount it by:
mount /dev/cciss/c0d1p1 /data
Then, if you run df -h command, you will see it mounted successfully.
root@steem:/var/www/html/2020-08-09# df -h
Filesystem         Size  Used Avail Use% Mounted on
udev               7.9G     0  7.9G   0% /dev
tmpfs              1.6G  8.7M  1.6G   1% /run
/dev/cciss/c0d0p5  917G  125G  746G  15% /
tmpfs              7.9G     0  7.9G   0% /dev/shm
tmpfs              5.0M     0  5.0M   0% /run/lock
tmpfs              7.9G     0  7.9G   0% /sys/fs/cgroup
/dev/cciss/c0d0p1  472M  102M  347M  23% /boot
/dev/cciss/c0d1p1  917G   72M  871G   1% /data
Lastly but not least, you can enable the auto-mount on system boot (startup) – by editing /etc/fstab:
#device        mountpoint             fstype    options  dump   fsck
/dev/cciss/c0d1p1    /data    ext4    defaults    0    1
It is recommended to use ‘blkid’ to get the universally unique identifier for a device; then we can use UUID= as a more robust way to identify the devices that works even if the disks are added and removed.
 blkid
/dev/cciss/c0d0p1: UUID="ffa28f9b-b9b5-437d-95b8-2ec232023104" TYPE="ext2" PARTUUID="29dbb074-01"
/dev/cciss/c0d0p5: UUID="5bebaf18-82d6-420e-88a5-c9af0a3c0c69" TYPE="ext4" PARTUUID="29dbb074-05"
/dev/cciss/c0d0p6: UUID="80d9ccb8-919c-4650-9679-2c749bb001ef" TYPE="swap" PARTUUID="29dbb074-06"
/dev/cciss/c0d1p1: UUID="f67ab138-bfd2-4b95-9407-8c1c7d07481b" TYPE="ext4" PARTUUID="3f044848-bd39-4726-b192-fe012594357f"
/dev/cciss/c0d0: PTUUID="29dbb074" PTTYPE="dos"
/dev/cciss/c0d1: PTUUID="d12882c2-3b5a-4256-b7d0-9cd5a8101d62" PTTYPE="gpt"
–EOF (The Ultimate Computing & Technology Blog) —
1133 wordsLast Post: Algorithm to Check if a Binary Tree can be Constructed via Hash Tables
Next Post: Reclaiming the Disk Space by Deleting the Logs of the Docker Container