Thousands of websites are using CloudFlare, the famous Content Delivery Network (CDN). The advantages of using CloudFlare are:
1. increase page loading speed so that content of website can be served distributed across the server in the world.
2. Shield servers sit between the visitor and your real server so that the Distribute DOS attack risks will be minimized.
Yes, it sounds too good to be true (free plan) but in this case, I’ve to say, yes, it is free and it is true that it will reduce the risks of website being compromised and also increases a lot the website loading speed.
SSL
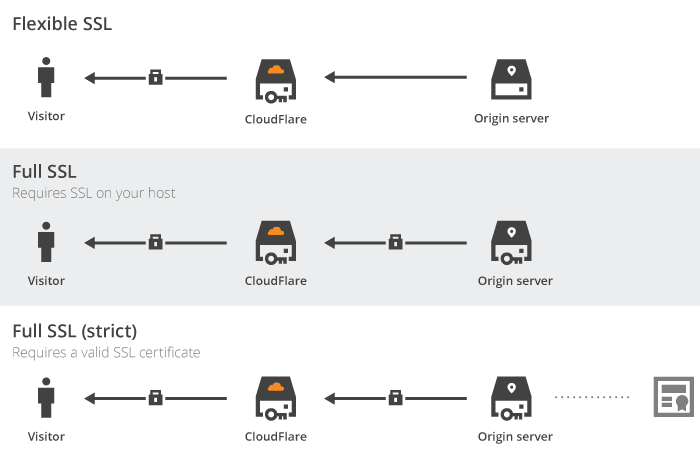
The SSL (so you will have secure HTTPS connections over insecure HTTP) supported by CloudFlare are: Flexible, Full and Strict Modes. The Flexible configuration doesn’t require your real server to have SSL certificates and hence can be set up for any websites. The Full and Strict models require your server to have SSL certificate however only the strict model will check the validity of the SSL certificate.
ssl certificates on CloudFlare
For free accounts, the activation is up to 24 hours (not instantly but quick enough). Strict mode is preferred because the CloudFlare encrypts the communication to and from your website using SSL.
Restore Visitor IP
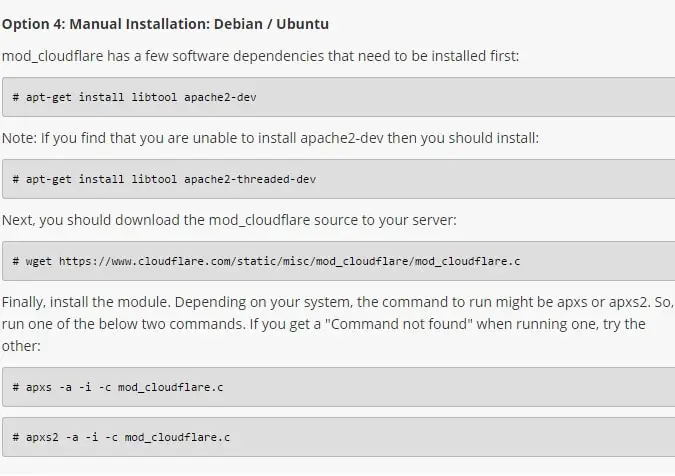
As CloudFlare servers sit between the visitor and your server, your server will see the CloudFlare IP address instead of visitor’s IP, which may affect your adsense ads geographic targeting. To resolve this issue, you can install a wordpress plugin. CloudFlare has a wordpress plugin to restore the visitor’s real IP address. Alternatively, you can install the mod_cloudflare Apache2 module (use sudo apache2ctl -M | sort to verify the modules loaded)
https://www.cloudflare.com/resources-downloads#mod_cloudflare
https://github.com/cloudflare/mod_cloudflare
Logging Real Visitor IP Addresses: mod_cloudflare for Apache httpd
HSTS
HSTS enforces a HTTPS connection (you cannot regret in the future after joinning the list, which is used by Chrome, Firefox browsers). Your website will be remembered in the browser (a list) to enforce a HTTPS connection whether or not the user types in the HTTPS://

HTTP Strict Transport Security (HSTS, RFC 6797) is a header which allows a website to specify and enforce security policy in client web browsers. This policy enforcement protects secure websites from downgrade attacks, SSL stripping, and cookie hijacking. It allows a web server to declare a policy that browsers will only connect using secure HTTPS connections, and ensures end users do not “click through” critical security warnings. HSTS is an important security mechanism for high security websites. HSTS headers are only respected when served over HTTPS connections, not HTTP.
CloudFlare supports HSTS so that it is easier to set this up one-click.
Redirect HTTP to HTTPS
You can do it via .htaccess
RewriteEngine On
RewriteCond %{SERVER_PORT} 80
RewriteRule ^(.*)$ https://uploadbeta.com/$1 [R=301,L]

RewriteEngine On
RewriteBase /
RewriteCond %{HTTP_HOST} !^uploadbeta.com$ [NC]
RewriteRule ^(.*)$ https://uploadbeta.com/$1 [L,R=301]
Or, create a page rule in CloudFlare –
http://*domain.com/*
“Always use HTTPS” = On
Other Plugins
WordPress – Insecure Content Fixer, this is a plugin to dynamically replace the HTTP with HTTPS version so you will have a green padlock on your address bar (otherwise will be grey because insecure contents are called.)
–EOF (The Ultimate Computing & Technology Blog) —
806 wordsLast Post: Curly Brace Group in Linux BASH
Next Post: Lighting-fast Delphi 2007 Compiling Speed